1. FlagLogo Preview
In each page of Flag Creator at the lowest part of the page you can view the FlagLogo Preview.
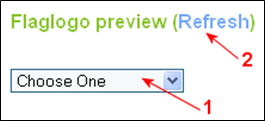
To show the FlagLogo preview you need to choose which one you want to view (Hosted, Visited, Hosted & Visited or Supporter). (Arrow 1)
If the FlagLogo will not appear or will not automatically update, you can click on Refresh. (Arrow 2)
Note: if you have not made yet a FlagLogo and don’t want a TeamLogo this preview will be blank.
2. Countries
To show the FlagLogo preview you need to choose which one you want to view (Hosted, Visited, Hosted & Visited or Supporter). (Arrow 1)
If the FlagLogo will not appear or will not automatically update, you can click on Refresh. (Arrow 2)
Note: if you have not made yet a FlagLogo and don’t want a TeamLogo this preview will be blank.

First of all you have to download all Hattrick flags that you have obtained until now.
Step 1
To download all the flags of your friendlies you have to click on “Download from Hattrickâ€. (Arrow 3)
Wait a moment and then all your flags will appear (Visited, Hosted and Home Country). (Arrow 4)

Step 2
3. TeamLogo
Step 1
To download all the flags of your friendlies you have to click on “Download from Hattrickâ€. (Arrow 3)
Wait a moment and then all your flags will appear (Visited, Hosted and Home Country). (Arrow 4)

To download the flags of your Supporters you have to click on “Paste themâ€. (Arrow 5)

At this point you need the source-code of the flag-page within Hattrick.
You can get it by right-clicking and choosing for "view page source" or "This frame -> view frame source".
In FireFox: right-click near the flags (on a blank space); select “This frame†and then click on “View frame source†and copy all the text that will appear in the new window.
In Internet Explorer: right-click near the flags (on a blank space); then click on “View Source†and copy all the text that will appear in the new window.
After that you have copied this code, paste it in the window that will appear after you’ve clicked on “Paste themâ€.
Finally click on “Paste!â€. (Arrow 6)

In this page you can make a choice for your TeamLogo, to be more precise: we, with the word “TeamLogoâ€, mean the really coat of arms of your team.
Restrictions:
1) Images need to be png, jpg or gif types.
2) Animated gifs are not supported, so the first frame will be taken.
3) Images can't be larger than 150 kb.
Change TeamLogo
After clicking on “Change TeamLogo†(arrow 7) there will be a new overlay. At this point you have three possibilities:
1) Upload logo: make this choice if you have your TeamLogo on your Hard Disk. If you want to upload a logo: click on “Browseâ€, select the image file (see Restrictions), click “Openâ€, and finally click “Uploadâ€.
2) Use logo located on the web: you need to copy URL of your TeamLogo in the textbox, and then click “Uploadâ€.
3) Use current HT logo: check this box if you want to use the TeamLogo that you already selected in Hattrick, and then click “Uploadâ€.
Note: remember to check the box near your choice, otherwise your choice will be unavailable. (Arrow 9)

No TeamLogo
You can make the choice to not have a TeamLogo, simply by clicking on No TeamLogo. (Arrow 8)
4. Flag Grating
Restrictions:
1) Images need to be png, jpg or gif types.
2) Animated gifs are not supported, so the first frame will be taken.
3) Images can't be larger than 150 kb.
Change TeamLogo
After clicking on “Change TeamLogo†(arrow 7) there will be a new overlay. At this point you have three possibilities:
1) Upload logo: make this choice if you have your TeamLogo on your Hard Disk. If you want to upload a logo: click on “Browseâ€, select the image file (see Restrictions), click “Openâ€, and finally click “Uploadâ€.
2) Use logo located on the web: you need to copy URL of your TeamLogo in the textbox, and then click “Uploadâ€.
3) Use current HT logo: check this box if you want to use the TeamLogo that you already selected in Hattrick, and then click “Uploadâ€.
Note: remember to check the box near your choice, otherwise your choice will be unavailable. (Arrow 9)

You can make the choice to not have a TeamLogo, simply by clicking on No TeamLogo. (Arrow 8)
Flags in a row
The number that you select in this box is the number of flags that you want show in a single row. (Arrow 10)
The number of rows will be defined in consequence of this number.
You can select it by left-clicking on the box.
For example: now the countries in Hattrick are 112 if you select 10 flags in a row, in this case you will have 12 rows (10 flags per row for the first 11 rows and only 2 flags in the last one)

In this box you can make a choice for the type of flags that you like to use. (Arrow 11)
There are 8 types between which you can make your choice.
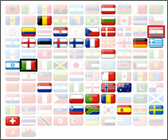
For example in the image below you can see respectively Coats of arms, Flag with Country code, HT flag (dark border), HT flag (soft border), National FIFA shield, Orbital Flag, Outfit of nation and Rounded flag of Italy:

Here you can select how you want that the flags are positioned. (Arrow 12)
Then you can select the order of this positioning system. (Arrow 13)
You have the opportunity to highlight your home country compared with the other ones. You can make it by selecting the color and the thickness of the line that will be placed around the flag of your home country.
To select the color of this line you have to click on pick color. (Arrow 14)
After this click will appear a new window with a pattern of colors, you can select the one that you prefer simply by left-clicking on a color. (Arrow 15)
If you don’t want the line and don’t want to highlight your home country you have to click on No color in this page. (Arrow 16)
To select the thickness of this line you have to click on the box and then on 1 pixel or 2 pixel. (Arrow 17)
If you don’t want the line and don’t want to highlight your home country you have to click on No border in this box.

Here you can select the percentage of opacity of the flags that you have not yet collected. This flags are different for the FlagLogo that you choose to use.
Lower is the percentage selected, less you can see the flag. (Arrow 18)
For example: if you want to show the Hosted FlagLogo you are selecting the opacity of countries that you have not yet hosted.

If you want to highlight the next country that you will meet, you have to check this box. (Arrow 19)
If you don’t want this highlighting, simply uncheck this box.

Here you can select the percentage of opacity of the flag that you will meet.
Lower is the percentage selected, less you can see the flag. (Arrow 20)
To select the color of the border you have to click on pick color. (Arrow 21)
After this click will appear a new window with a pattern of colors, you can select the one that you prefer simply by left-clicking on a color. (Arrow 22)
If you don’t want the line and don’t want to highlight your next country you have to click on No color in this new window. (Arrow 23)
To select the thickness of this line you have to click on the box and then on 1 pixel or 2 pixel. (Arrow 24)
If you don’t want the line and don’t want to highlight your next country you have to click on No border in this box.

At this point we will have something like this (with the choices of the examples):
Font: Type, Size and Color
Here you can select a general setting for the font that you will use in the next steps.
To select the font and the size that you prefer, simply left-click on the box, and make your choice. (arrow 25)
To select the color of the font you have to click on pick color. (arrow 26)
After this click will appear a new window with a pattern of colors, you can select the one that you prefer simply by left-clicking on a color. (arrow 27)
Note: The options you choose here will be used in the next step as defaults. You always can change it for every text separate, to give your layout a better style.

First of all in this page you have to choose in which one logo you want to add these items. You can do it by a simple left-clicking on the box. (arrow 28)
Note: after created the items, you can always change their position with drag & drop
For example: if you want to add these items to the Hosted logo, you have to select it first of all.

You can add variables simply clicking on Variables positioned at the lower part of the panel that will appear after that you select what you want to insert. (arrow 32)
After this click will appear a new small window. Here you can make your choice to which variables put into the text simply click on the variable you desire.
A variable is a value that will automatically auto update. Here we explain the meaning of each variable:
Countries done (%cd%): Number of countries collected;
Countries % done (%cp%):Percentage of countries collected;
Total countries (%ct%): Number of total countries you can collect;
Coolness done (%cod%): Coolness Rating collected;
Coolness % done (%cop%): Percentage of Coolness Rating Collected;
Total Coolness (%cot%): Total Coolness Rating you can collect;
Next Country name (English) (%nce%): English name of the next Country you will meet;
Next Country name (Native) (%ncn%): Native name of the next Country you will meet;
Note: you can manually put the variable by writing the code that is between brackets for each one variable.
Note: the variable will change for the logo you select (Hosted, Visited, Hosted & Visited, and Supporters)
Add a Text
You can select this option by a simple left-clicking on Add a Text. (arrow 29)
After this click will appear a new panel, here you can customize everything for a text.
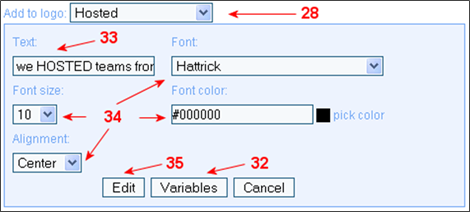
You have to insert your text in the box (arrow 33) and here you can also put some variables. You can customize the font (type, size and color) and the alignment of the text. (arrow 34)
At the end you have to click on Add (or Edit when you're in the edit mode) button. (arrow 35)
For example: you want to add the text “we HOSTED teams from these countries†with font type “Hattrickâ€, font size “10â€, font color “#000000†(Black) and you want that your text will be adjusted in “centerâ€
Add a Bar
You can select this option by a simple left-clicking on Add a Bar. (arrow 30)
After this click will appear a new panel, here you can customize everything for a bar.
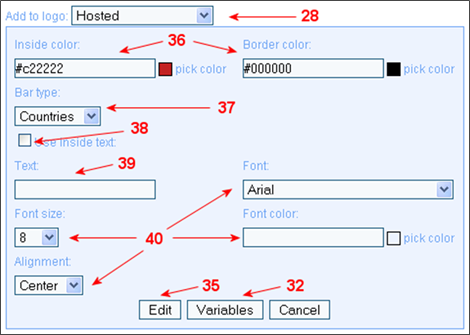
Here you can select the inside and border color for the bar (arrow 36) and the type of the bar. (arrow 37)
You can choose one between two types:
Countries: this bar will show the Percentage of countries collected;
Coolness: this bar will show Percentage of Coolness Rating collected.
If you desire to put some text inside the bar, you need to check the appropriate box (arrow 38) and then you have to insert your text in the box (arrow 39) and here you can also put some variables. You can customize the font (type, size and color) and the alignment of the text. (arrow 40)
At the end you have to click on Add (or Edit when you're in the edit mode) button. (arrow 35)
For example: you want to add the “Countries bar†with inside color “#c22222†and border color “#000000†without inside text (the box is unchecked).
Add a Line / Whitespace
You can select this option by a simple left-clicking on Add a Line/Whitespace. (arrow 31)
After this click will appear a new panel, here you can customize everything for a line.
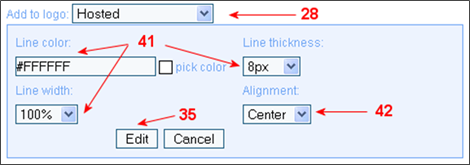
Here you can choose color, thickness and width of a line (arrow 41) and the alignment of this line. (arrow 42)
At the end you have to click on Add (or Edit when you're in the edit mode) button. (arrow 35)
For example: you desire an “8 pixel†white line (color “#FFFFFFâ€) that will go on from the outmost left to the outmost right (width percentage “100%â€) adjusted to the “centerâ€.
For example: we add to the logo:
Between logo and flags:
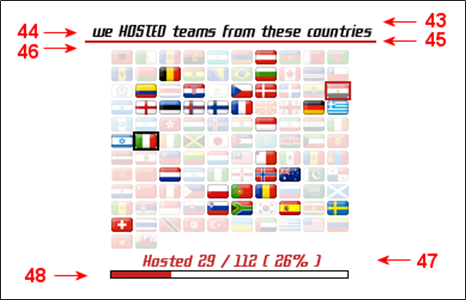
1) line: “8 pixel†white (color “#FFFFFFâ€) that will go on from the outmost left to the outmost right (width percentage “100%â€) adjusted to the “centerâ€; (arrow 43)
2) text: “we HOSTED teams from these countries†with font type “Hattrickâ€, font size “10â€, font color “#000000†(Black) and you want that your text will be adjusted in “centerâ€; (arrow 44)
3) line: “2 pixel†red brick (color “#c22222â€) that will go on from the outmost left to the outmost right (width percentage “100%â€) adjusted to the “centerâ€; (arrow 45)
4) line: “3 pixel†white (color “#FFFFFFâ€) that will go on from the outmost left to the outmost right (width percentage “100%â€) adjusted to the “centerâ€; (arrow 46)
Beneath flags:
5) text: “Hosted %cd% / %ct% ( %cp% )†with font type “Hattrickâ€, font size “10â€, font color “#c22222†(red brick) and you want that your text will be adjusted in “centerâ€; (arrow 47)
6) bar: “Countries bar†with inside color “#c22222†and border color “#000000†without inside text (the box is unchecked). (arrow 48)
We will obtain something like this, which is a complete FlagLogo:
7. Worldvision
Note: after created the items, you can always change their position with drag & drop
For example: if you want to add these items to the Hosted logo, you have to select it first of all.

You can add variables simply clicking on Variables positioned at the lower part of the panel that will appear after that you select what you want to insert. (arrow 32)
After this click will appear a new small window. Here you can make your choice to which variables put into the text simply click on the variable you desire.
A variable is a value that will automatically auto update. Here we explain the meaning of each variable:
Countries done (%cd%): Number of countries collected;
Countries % done (%cp%):Percentage of countries collected;
Total countries (%ct%): Number of total countries you can collect;
Coolness done (%cod%): Coolness Rating collected;
Coolness % done (%cop%): Percentage of Coolness Rating Collected;
Total Coolness (%cot%): Total Coolness Rating you can collect;
Next Country name (English) (%nce%): English name of the next Country you will meet;
Next Country name (Native) (%ncn%): Native name of the next Country you will meet;
Note: you can manually put the variable by writing the code that is between brackets for each one variable.
Note: the variable will change for the logo you select (Hosted, Visited, Hosted & Visited, and Supporters)
Add a Text
You can select this option by a simple left-clicking on Add a Text. (arrow 29)
After this click will appear a new panel, here you can customize everything for a text.
You have to insert your text in the box (arrow 33) and here you can also put some variables. You can customize the font (type, size and color) and the alignment of the text. (arrow 34)
At the end you have to click on Add (or Edit when you're in the edit mode) button. (arrow 35)
For example: you want to add the text “we HOSTED teams from these countries†with font type “Hattrickâ€, font size “10â€, font color “#000000†(Black) and you want that your text will be adjusted in “centerâ€

You can select this option by a simple left-clicking on Add a Bar. (arrow 30)
After this click will appear a new panel, here you can customize everything for a bar.
Here you can select the inside and border color for the bar (arrow 36) and the type of the bar. (arrow 37)
You can choose one between two types:
Countries: this bar will show the Percentage of countries collected;
Coolness: this bar will show Percentage of Coolness Rating collected.
If you desire to put some text inside the bar, you need to check the appropriate box (arrow 38) and then you have to insert your text in the box (arrow 39) and here you can also put some variables. You can customize the font (type, size and color) and the alignment of the text. (arrow 40)
At the end you have to click on Add (or Edit when you're in the edit mode) button. (arrow 35)
For example: you want to add the “Countries bar†with inside color “#c22222†and border color “#000000†without inside text (the box is unchecked).

You can select this option by a simple left-clicking on Add a Line/Whitespace. (arrow 31)
After this click will appear a new panel, here you can customize everything for a line.
Here you can choose color, thickness and width of a line (arrow 41) and the alignment of this line. (arrow 42)
At the end you have to click on Add (or Edit when you're in the edit mode) button. (arrow 35)
For example: you desire an “8 pixel†white line (color “#FFFFFFâ€) that will go on from the outmost left to the outmost right (width percentage “100%â€) adjusted to the “centerâ€.

For example: we add to the logo:
Between logo and flags:
1) line: “8 pixel†white (color “#FFFFFFâ€) that will go on from the outmost left to the outmost right (width percentage “100%â€) adjusted to the “centerâ€; (arrow 43)
2) text: “we HOSTED teams from these countries†with font type “Hattrickâ€, font size “10â€, font color “#000000†(Black) and you want that your text will be adjusted in “centerâ€; (arrow 44)
3) line: “2 pixel†red brick (color “#c22222â€) that will go on from the outmost left to the outmost right (width percentage “100%â€) adjusted to the “centerâ€; (arrow 45)
4) line: “3 pixel†white (color “#FFFFFFâ€) that will go on from the outmost left to the outmost right (width percentage “100%â€) adjusted to the “centerâ€; (arrow 46)
Beneath flags:
5) text: “Hosted %cd% / %ct% ( %cp% )†with font type “Hattrickâ€, font size “10â€, font color “#c22222†(red brick) and you want that your text will be adjusted in “centerâ€; (arrow 47)
6) bar: “Countries bar†with inside color “#c22222†and border color “#000000†without inside text (the box is unchecked). (arrow 48)
We will obtain something like this, which is a complete FlagLogo:

If you want to insert the Worldvision, first of all you have to check the box near Use worldvision. (arrow 49)
After this, all that you have to do is to choose your pattern of color. (arrow 50)
You can choose the color for Hosted, Visited, Hosted & Visited, Supporters, Next country, Not done, Not in Hattrick.
Note: the Worldvision will be placed beneath the lower item of the FlagLogo
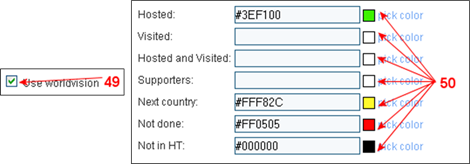
For example: you want green (color #3EF100) for Hosted countries; no color (color blank) for Visited, Hosted & Visited and Supporters; yellow (color #FFF82C) for Next country; red (color #FF0505) for Not done (these are the countries not yet met) and finally black (color #000000) for the countries that are Not in Hattrick.

8. Counter
After this, all that you have to do is to choose your pattern of color. (arrow 50)
You can choose the color for Hosted, Visited, Hosted & Visited, Supporters, Next country, Not done, Not in Hattrick.
Note: the Worldvision will be placed beneath the lower item of the FlagLogo

For example: you want green (color #3EF100) for Hosted countries; no color (color blank) for Visited, Hosted & Visited and Supporters; yellow (color #FFF82C) for Next country; red (color #FF0505) for Not done (these are the countries not yet met) and finally black (color #000000) for the countries that are Not in Hattrick.

If you want to add a counter to your logo, you have to check the appropriate box. (arrow 51)
You can choose between two kinds of counter:
Unique Visitors Counter: this counter will count all different visitors who will visit your main page. If the same user visits more then one time your main page, this counter will increase only the first time.
All Visitors Counter: this counter will count all the time that your page will be visited. If the same user visits more then one time your main page, this counter will increase on each one visit.
You can choose the starting value of the counter by writing it in the appropriate box (arrow 52).
Then you can use an Image Counter in place of a simple text.
If you want to use a text you can choose type, height and color of the text. (arrow 53)
If you want to use an image for the Counter, simply select it with a left-click on the appropriate box.
Finally you have to set the right and up offset.
You can do it manually, writing the value of X Offset and Y Offset (arrow 54)
You can do it by checking the box Edit Offset (arrow 55) and then by clicking on the FlagLogo preview in the point where you want to place it.
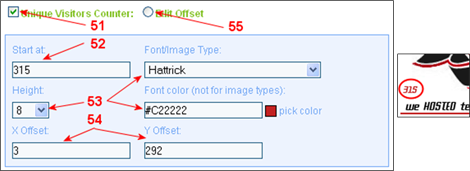
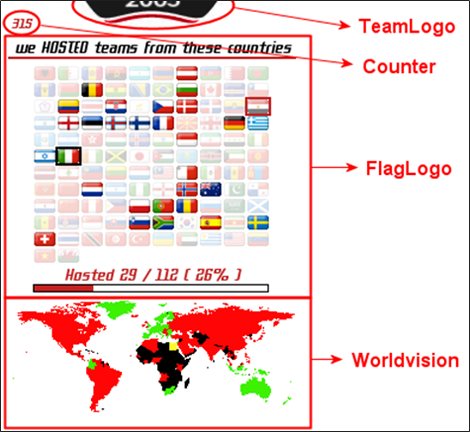
For example: you want to add a Unique Visitors Counter, you desire “315†like starting point, you want that it is in the text form and will make your choice for the font (type “Hattrickâ€, Height “8†and color “#C22222â€) and you want to place it in down left (X Offset “3†- Y Offset “292â€).
Finally we probably will obtain something like this (using the settings of the examples):
9. Save
You can choose between two kinds of counter:
Unique Visitors Counter: this counter will count all different visitors who will visit your main page. If the same user visits more then one time your main page, this counter will increase only the first time.
All Visitors Counter: this counter will count all the time that your page will be visited. If the same user visits more then one time your main page, this counter will increase on each one visit.
You can choose the starting value of the counter by writing it in the appropriate box (arrow 52).
Then you can use an Image Counter in place of a simple text.
If you want to use a text you can choose type, height and color of the text. (arrow 53)
If you want to use an image for the Counter, simply select it with a left-click on the appropriate box.
Finally you have to set the right and up offset.
You can do it manually, writing the value of X Offset and Y Offset (arrow 54)
You can do it by checking the box Edit Offset (arrow 55) and then by clicking on the FlagLogo preview in the point where you want to place it.

For example: you want to add a Unique Visitors Counter, you desire “315†like starting point, you want that it is in the text form and will make your choice for the font (type “Hattrickâ€, Height “8†and color “#C22222â€) and you want to place it in down left (X Offset “3†- Y Offset “292â€).
Finally we probably will obtain something like this (using the settings of the examples):

This is the last step, to save you have only to click on Save. (arrow 56)

Note: if you don’t save your logo, you can’t use your logo. And if don’t save your logo and close the page you will lose your setting not saved.
After this click, you will be automatically redirected on the Grab Codes Page. Here you can copy the URL of the logo you prefer to use.
Note: text and bars will appear only in the logo you have added in.
10. Paste Code in hattrick

Note: if you don’t save your logo, you can’t use your logo. And if don’t save your logo and close the page you will lose your setting not saved.
After this click, you will be automatically redirected on the Grab Codes Page. Here you can copy the URL of the logo you prefer to use.
Note: text and bars will appear only in the logo you have added in.
Finally, to make effective your logo, you have to paste the copied URL in the correct box on the “Change Team Logo†Hattrick page. (arrow 57)
Note: remember to click on Change button, otherwise your logo will not appear. (arrow 58)

Note: remember to click on Change button, otherwise your logo will not appear. (arrow 58)

